Looking for something new to try? Soft pillowy bread all coiled, layered and pretty. It’s a happy time! If you decide to prepare this recipe, below you will find all the instructions you need. All the ingredients and 9 steps are waiting to be used by you. Bon Appetit!
Ingredients:
– 2 teaspoons dry instant yeast
– 1 tablespoon sugar or honey
– 100ml warm milk
– 500g all-purpose flour, plus extra for kneading and flouring
– 1 teaspoon salt
– 2 eggs, lightly beaten
– 150 ml warm milk (extra)
– 2 tablespoons olive oil
– 1/2 teaspoon vinegar or lemon juice
– 100 g butter, melted and cooled
For the Glaze
– 1 egg yolk
– 2 tablespoons milk
Follow the steps:
Step 1. Dissolve the yeast and the sugar in 100 ml warm milk, cover and leave the composition in a warm place to rise for 10 minutes.
Step 2. In another bowl, sift the flour and the salt together. Make a well in the middle and add into it the beaten eggs, the remaining warm milk, olive oil, vinegar and the yeast mixture. Knead the dough with your hands or in your mixer until it separates from the sides of the bowl. Remove the dough, place it on a lightly floured surface and knead for about 10 minutes until it becomes a soft, pliable dough. Place it in a greased bowl, covered with a towel and leave it to rise in a warm place until doubled in volume – about an hour.
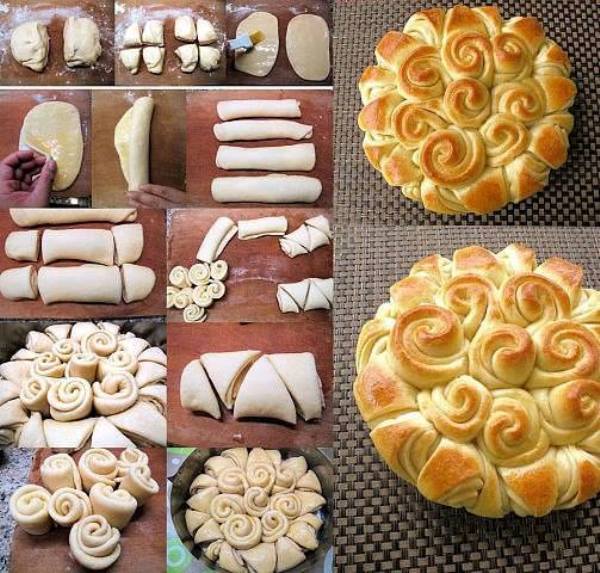
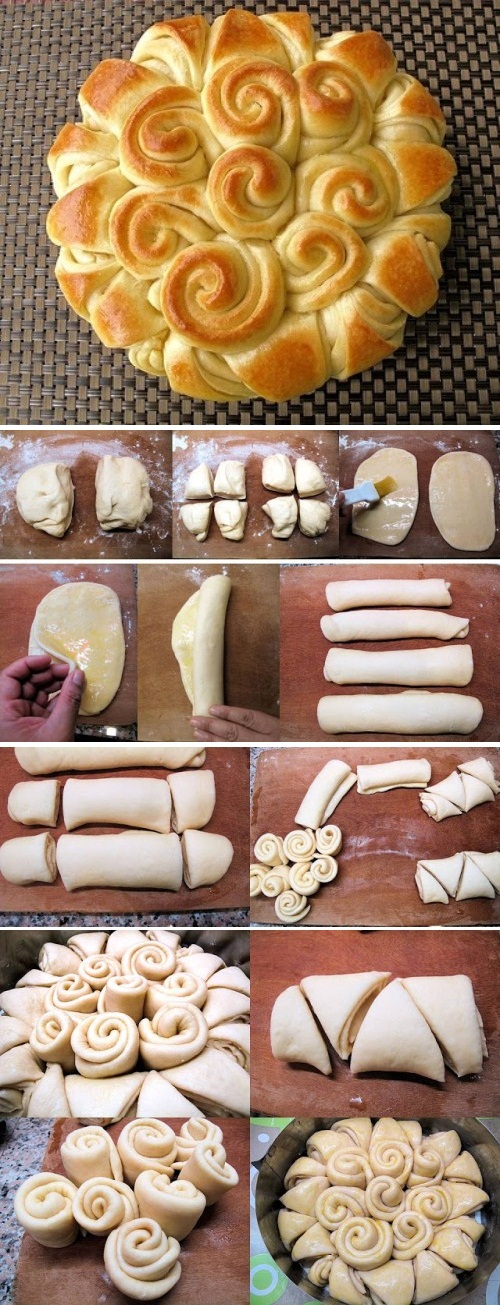
Step 3. Punch the risen dough and transfer it on a floured surface, then divide the dough into 2 equal parts. Divide each of them again into 4 parts, so to have 8 pieces of dough altogether.
Step 4. Roll each piece of dough out into a roughly rectangular shape with a thickness of 3-5 mm. Brush cooled, melted butter over each piece. Set aside the remaining butter for later use.
Step 5. Place one piece of rectangular dough over another one and start to roll a cylinder. Do the same with the rest of the dough; you will end up with 4 cylindrical rolls altogether.
Step 6. Cut each roll into three pieces this way – slice both the ends of the roll (about 1.5 inch long each end), and put these two pieces aside. Then cut the middle part of the roll into 4 triangles.
Step 7. Preheat the oven to 180C. Grease or line a large baking tray. In the middle of the tray, arrange the cut ends of the rolls around each other to form a circle, placing the cut sides down. Arrange the cut triangles to surround completely the middle circle. Cover it with a towel and leave the dough to rise in a warm place for about 30-40 minutes.
Step 8. Beat the yolk and the milk with a fork to form a glaze and brush the top of the bread with this glaze. (You can sprinkle with sesame seeds or other dry toppings at this point.) Bake the bread for 20-30 minutes, reducing the temperature to 160C after 10 minutes in the oven.
Step 9. Brush the bread with melted butter as soon as it comes out of the oven, cover it with a towel and leave it to cool for 10-15 minutes before eating.
Source: foodivakitchen
Rózsakalács
This would also be beautiful as cinnamon rolls!,
i love your recipes.but would you PLEASE make them more printer friendly?
Its easy… just drag your mouse over the text – do full copy/paste, save it in a word-format…
…I agree with the PRINTER FRIENDLY!… when you “copy/paste” into WORD, you get one gigantic paragraph….not the recipe format…. 🙁
Love the recipe but can you please not use ingredants in ml and g I am still in America thanks
Just use google.com to convert everything… but you will still need to weigh everything out though.
This bread is perfect for making garlic-herb, focaccia-style, cinnamon/sugar, even a fruit preserve with cream cheese….
I even betcha pizza-style too!
Fantástico, muy interesante, una gran pagina saludos
It would be nice if your recipes were more accommodating to us Americans, we’d appreciate it if you’d add measurements in ounces to your recipes and also make them easier to print. While your right that we can copy and paste and we can look up each item and do the conversation on Google, somehow you’d seem less stuck up (I got that impression from the dismissive manner you used when answering Carol Webster and Georgene Bricker) if you’d just include their suggestions in your offerings. Doesn’t seem like your being a much of caring contributor, because if you were, rather than expecting hundreds or perhaps thousands of us to do it all individually just seems unfriendly when you’d just have to do it once, include it with the recipe and we’d be all set and ready to go. Just sayn’.
The same thing you complain about happens in reverse, when anyone from the res of the world, who does not live in USA, needs to convert every recipe to Metric System.
Instead of complaining so much, when any of you does the conversion, please post it in one comment, to share with all the other people who do not have or care to procure a scale with Metric measures (which, by the way, is a very cheap and useful tool, especially when baking).
I am norwegian and ihave no problem reading and understand the recepy.
I agree with you Susana.
Super bread ! And so easy ! Never made a bread which was this easy but turns out this fabulous . Thanks for the wonderful recipe !
Approximately what size pan did you use for this recipe? Thank you very much – this is beautiful.
Totally agree!
It is a shame that something with the the word Happy in it can turn some people into nasty behavior. I for one am HAPPY to convert recipes. It is not a taxing exercise but one that will ultimately bring joy and happiness when they taste your delicious bread. I hope this finds you well in light of the current worldwide situation. This bread should bring happiness to all.
I love having the measurements in metric!!! I’m born in the USA and been alive for 65 years. For baking this measure is the best! Thank you for your recipe. People need to expand their minds.